Have you ever heard about Mac Error 2003F? A few sights cause more immediate concern for a Mac user than a black screen displaying a flashing globe, an exclamation mark, and the cryptic alert: [apple.com/support](https://apple.com/support) -2003F (or simply Error 2003F).
This error halts your Mac during one of its most critical maintenance routines: macOS Internet Recovery. Whether you are wiping a machine to sell it, recovering from a corrupted operating system update, or swapping out an internal drive, getting stuck on Error 2003F cuts off your access to standard recovery tools.
Understanding how to fix Mac error 2003F requires understanding what happens when your computer initializes.
Unlike everyday software bugs inside macOS, Error 2003F is an EFI (Extensible Firmware Interface) pre-boot network failure. Your Mac cannot establish a secure, stable handshake with Apple’s recovery servers to download the necessary disk image. (BaseSystem.dmg).
+———-+
[!] Mac Screen
(Spinning Globe)
apple.com/support -2003F
+—–+
|
v
[EFI Firmware fails to fetch BaseSystem.dmg from Apple CDN]
This guide explains the technical causes of the issue and provides step-by-step solutions to resolve the error on Intel and Apple Silicon Macs.
What is Mac Error 2003F? (Technical Breakdown)
To understand how to fix Mac error 2003F, it helps to know how Apple’s recovery ecosystem works under the hood.
Modern Macs have two primary recovery mechanisms:
- Local Recovery (
Command + Ron Intel / Long Press Power on Apple Silicon): The Mac boots from an isolated, hidden partition on the internal drive containing a minimalist macOS utility environment. - Internet Recovery (
Option + Command + RorOption + Shift + Command + Ron Intel) When the local recovery partition is missing, damaged, or reformatted, the Mac’s low-level firmware boots directly into a mini-network client. It connects to the local network, contacts Apple’s Content Delivery Network (CDN), downloads an ephemeral recovery image into the Mac’s RAM, and boots from that temporary RAM disk.
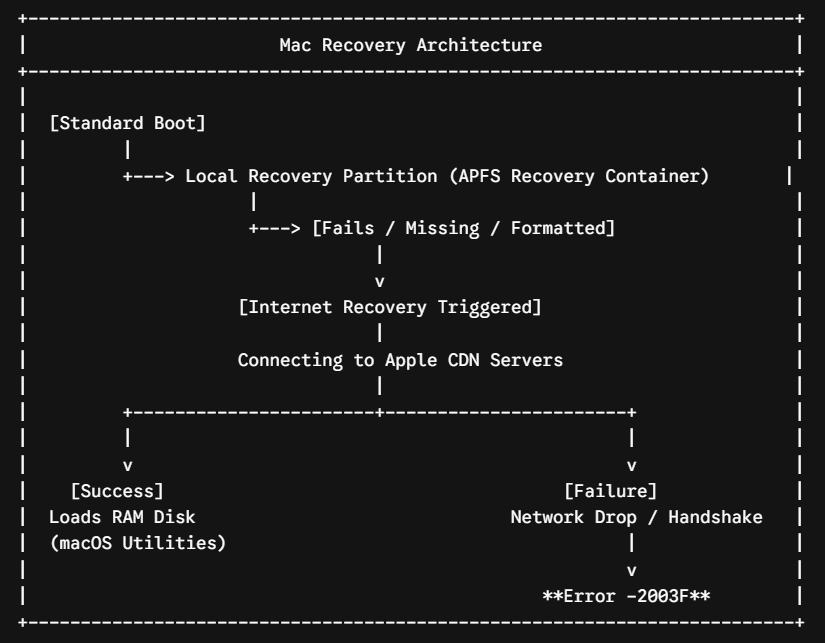
When Error 2003F appears, the EFI network stack failed during this transfer. The firmware encountered a fatal socket timeout, SSL/TLS handshake negotiation drop, or corrupted packet stream while downloading the recovery payload.
Common Recovery Error Code Variants:
| Error Code | Primary Root Cause | Subsystem |
-2003F | Network connection dropped / TLS handshake timed out | EFI Network Stack |
-2002F | Wi-Fi authentication or security protocol mismatch (WPA3/Enterprise) | 802.11 Pre-boot Driver |
-1008F | Activation Lock or Firmware Password conflict blocking CDN pull | Apple T2 / Secure Enclave |
-1005F | DHCP server failed to assign an IP address to the Mac’s EFI client | Local Router / Subnet |
-5101F | Incompatible firmware version trying to pull an obsolete OS catalog | Boot ROM / Apple Catalog |
Because learning how to fix Mac error 2003F requires isolating network and firmware variables, identifying where the transfer failed saves hours of trial and error.
Primary Causes of Mac Error 2003F
Before jumping into solutions, let’s identify why your Mac cannot complete the recovery handshake:
- Unstable Wi-Fi Signals & Packet Drops: Recovery downloads are several gigabytes. If the Wi-Fi signal drops even briefly, the EFI firmware may abort the download instead of retrying.
- Incompatible Wi-Fi Security Protocols (WPA3 / 802.1X): Many older Mac EFI bootloaders only support WPA or WPA2-Personal (AES/TKIP). If your router uses WPA3-Personal, WPA3-Enterprise, or an 802.1X RADIUS server, the Mac cannot complete the pre-boot handshake.
- Captive Portals (Hotels, Dorms, Coffee Shops): Internet Recovery does not include a full web browser to click through “Accept Terms” splash pages.
- DNS Misconfigurations & ISP Filtering: If your Internet Service Provider uses aggressive DNS redirection or filters Apple CDN endpoints (
osrecovery.apple.com), the lookup fails. - Corrupted NVRAM/PRAM: Cached network configurations or corrupted boot arguments stored in Non-Volatile RAM can force the Mac into a broken boot loop.
- APFS Container / Disk Damage: Physical partition errors or bad NAND blocks on the internal drive can prevent the recovery payload from writing its temporary workspace.
- Apple Server Outages: Occasionally, regional Apple recovery servers undergo maintenance, returning unexpected error codes.
Preliminary Checks Before In-Depth Troubleshooting of Mac Error 2003F
The first step in fixing Mac error 2003F is to rule out external factors before changing system settings.
| Preliminary Checklist |
------------------------
1. Check Apple System Status (CDN / Services)
2. Disconnect non-essential external hardware
3. Power-cycle the local modem & router
4. Verify power adapter is firmly connected
Check Apple’s Server Status
Apple doesn’t have an explicit status light for “macOS Internet Recovery,” but service interruptions in macOS Software Update, iCloud Account & Sign In, or the Mac App Store often mirror outages on the recovery distribution network. Check the official Apple System Status Page
from an alternate device. If services show yellow or red alerts, wait an hour before trying again.
Disconnect Non-Essential Peripherals
Unplug all external hard drives, third-party docks, Thunderbolt hubs, external displays, and USB accessories. Faulty third-party USB-C hubs can emit RF interference that disrupts the 2.4 GHz and 5 GHz Wi-Fi bands on MacBooks, resulting in dropped packets during EFI network recovery. Leave only your official Apple charger connected.
Power Cycle Your Modem and Router
Turn off your home modem and router, wait 60 seconds to clear internal DNS and ARP caches, and plug them back in. Once the network is fully up, restart the recovery process.
1: Switch to a Wired Ethernet Connection
When researching how to fix Mac error 2003F, using a physical Ethernet cable is the single most effective solution.
Wired Ethernet Architecture
--------

  [MacBook / Mac mini]
          |
     (USB-C Port)
          |
  [Apple USB-C to Gigabit Ethernet Adapter]
          |
    (RJ45 Cable)
          |
  [Router / Switch LAN Port] ----> [Zero Wireless Interference / DHCP]
Why Ethernet Resolves Mac Error 2003F?
In the pre-boot EFI environment, Wi-Fi drivers are basic. They lack the advanced roaming, automatic channel switching, and error-correction capabilities found in full macOS. A wired Ethernet connection eliminates packet drops, avoids wireless encryption mismatches, and connects directly via DHCP.
Step-by-Step Connection Guide:
- Connect an Ethernet cable (Cat 5e, Cat 6, or higher) directly from your router’s LAN port to your Mac.
- If your Mac lacks a dedicated Ethernet port (e.g., MacBook Air, modern MacBook Pro), use an Apple USB-C to Gigabit Ethernet Adapter or a known-compatible Thunderbolt dock.
- Shut down your Mac completely by holding down the Power button for 10 seconds.
- Power on the Mac and immediately press and hold:
Option + Command + R(To download the latest compatible macOS).
- Release the keys once you see the spinning globe on the screen.
- The Mac will skip the Wi-Fi network selection and immediately start downloading the recovery environment over the wired link.
2: Resolve Wi-Fi & Network Configuration Issues
If you don’t have an Ethernet cable, fixing Mac error 2003F means fine-tuning your wireless environment to accommodate the EFI firmware’s limited network stack.
Wi-Fi Troubleshooting Flow
------------------

[Current Wi-Fi Network] ---> Error -2003F
           |
+---> Try Personal Hotspot (WPA2) ---> Success
           |
+---> Change Router to 2.4 GHz WPA2-AES
           |
+---> Switch Router DNS to 1.1.1.1 / 8.8.8.8
Avoid Captive Portals and 802.1X Enterprise Networks.
If you are at a university, hotel, corporate office, or public café, your network likely requires web authentication. The Mac EFI environment cannot load login screens.
- Fix: Move the Mac to a standard private home network, or use a mobile hotspot.
Use a Mobile Hotspot (iPhone or Android)
A smartphone hotspot creates a simple, clean, unmanaged connection that bypasses complex router firewalls and captive portals.
- On your iPhone, open Settings > Personal Hotspot.
- Turn on Allow Others to Join.
- If using an iPhone 12 or newer, enable the Maximize Compatibility toggle (this forces the broadcast to 2.4 GHz with standard WPA2-Personal security, which older Mac EFI chips handle reliably).
- Restart your Mac, hold
Option + Command + R, and choose your phone’s hotspot from the network drop-down menu. - Enter your hotspot password and allow the recovery image to download.
Adjust Router Settings: WPA2, 2.4GHz, and Public DNS
If your home router causes Error 2003F, log into your router’s admin dashboard (192.168.1.1 or 192.168.0.1) from another device and adjust the following:
- Security Mode: Temporarily switch security from WPA3-Personal or WPA2/WPA3 Mixed to WPA2-PSK (AES).
- Frequency Band: Connect your Mac to the 2.4 GHz band rather than the 5 GHz or 6 GHz band if you are far from the router. 2.4 GHz offers better range and wall penetration, reducing dropped packets during multi-gigabyte downloads.
- Primary / Secondary DNS: Change your router’s DNS settings to high-availability public resolvers:
- Cloudflare DNS:
1.1.1.1and1.0.0.1 - Google DNS:
8.8.8.8and8.8.4.4
- Cloudflare DNS:
3: Resetting NVRAM/PRAM and SMC (Intel Macs)
A proven way to fix Mac error 2003F on Intel-based MacBooks, iMacs, and Mac minis is to clear corrupted low-level hardware parameters.
NVRAM Parameter Reset
----------
[Command] + [Option] + [P] + [R] held simultaneously

1. Clears temporary hardware state & screen resolution
2. Flushes corrupted network caches & boot volume pointers
3. Restores default EFI device selection flags
How to Reset NVRAM/PRAM
NVRAM (Non-Volatile Random-Access Memory) holds system settings including boot-disk selection, kernel panic logs, display resolution, and cached Wi-Fi credentials. A corrupted boot flag in NVRAM can repeatedly break the Internet Recovery handshake.
- Shut down your Mac completely.
- Press the Power button, and immediately press and hold
Command + Option + P + Rtogether. - Keep holding all four keys for approximately 20 seconds:
- On Macs that play a startup chime, release the keys after the second startup chime.
- On Macs with the Apple T2 Security Chip, release the keys after the Apple logo appears and disappears for the second time.
- Immediately hold down
Option + Command + Rto re-enter Internet Recovery with a fresh NVRAM state.
How to Reset the System Management Controller (SMC)
The SMC controls thermal management, power distribution, battery charging, and low-level board communications. A locked SMC state can cause network adapters to sleep or drop power during long recovery downloads.
For Mac Laptops with Non-Removable Batteries (and No T2 Chip):
- Shut down the Mac.
- On the built-in keyboard, press and hold the Left Shift + Left Control + Left Option keys, then press and hold the Power button simultaneously.
- Hold all four keys down for 10 seconds.
- Release all keys, then press the Power button to turn on the Mac.
If you are using Mac Laptops with Apple T2 Security Chip (2018–2020 Intel):
- Shut down the Mac.
- Press and hold the Power button for 10 seconds, then release it.
- Wait a few seconds, then press the Power button to turn on the Mac.
- If that fails: Shut down, then press and hold Right Shift + Left Option + Left Control for 7 seconds. While holding those keys, press and hold the Power button for another 7 seconds. Release all keys, wait 5 seconds, and power on.
What about Desktop Macs (iMac, Mac mini, Mac Pro):
- Shut down the Mac and unplug the power cord.
- Wait 15 seconds.
- Plug the power cord back in, wait 5 seconds, and press the Power button.
(Note: Apple Silicon M1, M2, M3, and M4 Macs do not feature an SMC or manual NVRAM key combinations; their low-level power states reset automatically upon complete shutdown and cold boot.)
4: Alternate Recovery Key Combinations (Intel Macs)
Many users don’t realize Intel hardware has three distinct recovery shortcuts. Fixing Mac error 2003F can be as simple as changing the startup key combination.
Intel Recovery Key Matrix
---------------------

[Command + R] --> Local Recovery (Internal SSD Partition)

[Option + Command + R] --> Internet Recovery (Latest Compatible OS)

[Shift + Option + Command + R] --> Internet Recovery (Factory Original OS)
The Three Startup Combinations:
Command + R(Local Recovery):- Attempts to boot from the internal recovery partition rather than downloading from the internet.
- Why use it: If your local partition is intact, this bypasses the network entirely and prevents Error 2003F.
Option + Command + R(Latest Compatible Internet Recovery):- Contacts Apple’s CDN to install the newest macOS release compatible with your hardware.
- Why use it: Newer recovery images contain updated TLS security certificates and enhanced Wi-Fi drivers that communicate reliably with modern routers.
Shift + Option + Command + R(Factory Shipped Internet Recovery):- Queries Apple’s catalog for the macOS version that originally shipped with your Mac (or the closest available version).
- Why use it: If Apple’s CDN catalog for newer macOS versions fails or has a broken image header, reverting to the factory image often bypasses the 2003F error.
5: Recovery & Startup Options on Apple Silicon (M1/M2/M3/M4)
On modern Apple Silicon architectures, recovery is handled differently than on legacy Intel platforms. If you encounter network errors on an M-series Mac, fixing Mac error 2003F requires native Apple Silicon diagnostic workflows.
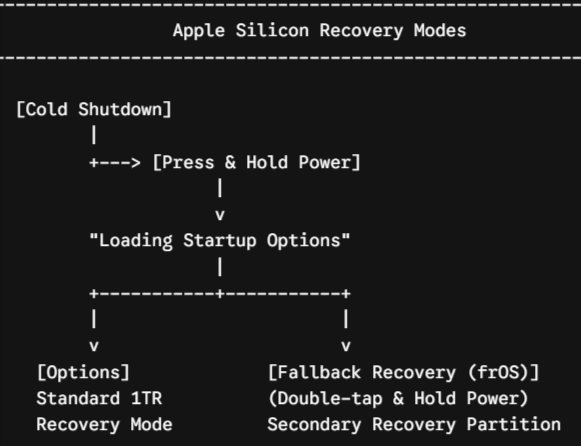
Accessing One True Recovery (1TR)
- Completely shut down your Mac (choose Apple menu > Shut Down, or hold the Touch ID/power button until the screen goes black).
- Press and hold the Power button (Touch ID).
- You will see “Continuing to hold the power button for startup options.” Keep holding.
- When the text changes to “Loading startup options”, release the button.
- Select Options (the gear icon) and click Continue.
- Enter your Mac administrator password if prompted.
Using Fallback Recovery (frOS)
If standard 1TR Recovery fails or displays network errors, Apple Silicon includes a hidden safety layer: Fallback Recovery (frOS).
- Shut down the Mac completely.
- Press the Power button once, release it, then immediately press and hold the Power button again (a double-tap-and-hold action).
- Keep holding until you see “Loading startup options”.
- Fallback recovery boots a secondary, read-only copy of the recovery system stored on a dedicated hardware container, bypassing corrupt primary recovery partitions.
6: Repairing Startup Disk via Disk Utility (First Aid)
Sometimes Error 2003F occurs because the EFI bootloader cannot allocate scratch space on an internal APFS container with corrupt directory structures. Running Disk Utility First Aid repairs file system discrepancies and partition maps.
Disk Utility Repair Sequence
----------------

1. Click [View] -> Select [Show All Devices]

2. Repair hierarchy from bottom to top:
 a. Volumes (e.g., Macintosh HD - Data)     [Run First Aid]
 b. Volumes (e.g., Macintosh HD)            [Run First Aid]
 c. APFS Container (e.g., Container disk1)  [Run First Aid]
 d. Physical Drive (e.g., APPLE SSD AP0512) [Run First Aid]
How to Run First Aid:
- Boot into Recovery Mode (via local recovery, alternate key combinations, or a bootable drive).
- From the macOS Utilities screen, select Disk Utility and click Continue.
- In Disk Utility, click the View menu at the top left and select Show All Devices (do not skip this step; you must see the physical drive).
- In the sidebar, inspect your internal disk hierarchy. Run First Aid from the lowest volume up to the highest physical drive:
- Select the data volume (
Macintosh HD - Data) > Click First Aid > Click Run. - Select the system volume (
Macintosh HD) > Click First Aid > Click Run. - Select the APFS Container > Click First Aid > Click Run.
- Select the top-level Physical Disk (e.g.,
APPLE SSD...) > Click First Aid > Click Run.
- Select the data volume (
- If First Aid reports that it repaired errors, restart your Mac and try Internet Recovery again.
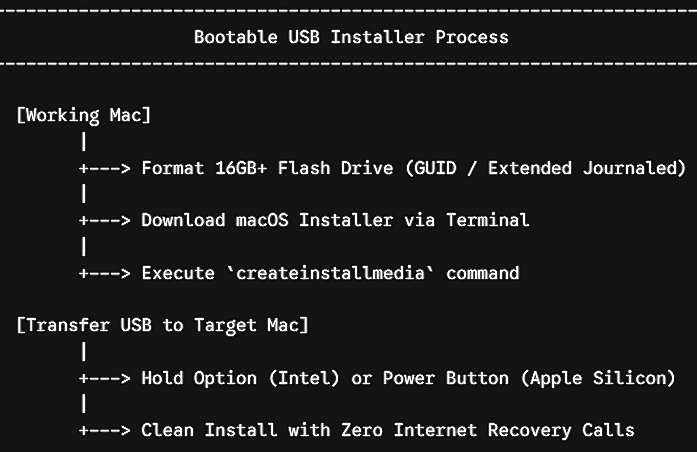
7: The Permanent Workaround — Create a Bootable USB Installer
If your network setup or ISP keeps triggering network failures during Internet Recovery, the definitive solution is to bypass Internet Recovery entirely with a bootable macOS USB installer.
Prerequisites
- A secondary working Mac (or a friend’s Mac).
- A USB flash drive or external SSD with at least 16 GB to 32 GB of storage.
- (For Macs with the T2 Security Chip): Startup Security Utility configured to allow external booting (see Section 11).
Step 1: Format the USB Flash Drive
- Insert the USB drive into the working Mac.
- Open Disk Utility (Press
Command + Space, typeDisk Utility, and pressEnter). - Click View > Show All Devices.
- Select the parent USB physical drive in the sidebar, then click Erase in the toolbar.
- Configure the erase parameters:
- Name:
MyVolume(Keep this exact name for easy terminal copy-pasting). - Format: Mac OS Extended (Journaled).
- Scheme: GUID Partition Map.
- Name:
- Click Erase, wait for the process to complete, and click Done.
Step 2: Download the Full macOS Installer Package
On the working Mac, open Terminal (Command + Space > type Terminal > Enter) and query Apple’s update servers for full installer packages:
Bash
softwareupdate --list-full-installers
Find the version you need, then run the fetch command:
Bash
# Example: Download macOS Sonoma
softwareupdate --fetch-full-installer --full-installer-version 14.5

# Example: Download macOS Ventura
softwareupdate --fetch-full-installer --full-installer-version 13.6.7
Alternatively, download the official installer directly from the Mac App Store by searching for “macOS Sequoia,” “macOS Sonoma,” or “macOS Ventura,” which places the installer application into your /Applications folder.
Step 3: Write the Installer to USB using createinstallmedia
In Terminal, run the command for your target operating system. (Make sure your USB drive is named MyVolume):
For macOS Sequoia:
Bash
sudo /Applications/Install\ macOS\ Sequoia.app/Contents/Resources/createinstallmedia --volume /Volumes/MyVolume --nointeraction
For macOS Sonoma:
Bash
sudo /Applications/Install\ macOS\ Sonoma.app/Contents/Resources/createinstallmedia --volume /Volumes/MyVolume --nointeraction
For macOS Ventura:
Bash
sudo /Applications/Install\ macOS\ Ventura.app/Contents/Resources/createinstallmedia --volume /Volumes/MyVolume --nointeraction
For macOS Monterey:
Bash
sudo /Applications/Install\ macOS\ Monterey.app/Contents/Resources/createinstallmedia --volume /Volumes/MyVolume --nointeraction
For macOS Big Sur:
Bash
sudo /Applications/Install\ macOS\ Big\ Sur.app/Contents/Resources/createinstallmedia --volume /Volumes/MyVolume --nointeraction
For macOS Catalina:
Bash
sudo /Applications/Install\ macOS\ Catalina.app/Contents/Resources/createinstallmedia --volume /Volumes/MyVolume --nointeraction
Press Return, enter your Mac administrator password when prompted, and press Return again. Wait until Terminal prints Install media now available at... and reaches 100%.
Step 4: Boot from the USB Installer on the Target Mac
- Safely eject the USB drive from the working Mac and insert it into the Mac showing Error 2003F.
- Power up the Mac using the appropriate method for its processor:
- On Intel Macs: Hold down the
Option(Alt) key immediately after pressing the power button until the startup manager appears. - On Apple Silicon Macs: Press and hold the Power button until the screen displays “Loading startup options”.
- On Intel Macs: Hold down the
- Select the yellow external drive icon labeled Install macOS [Version] and press Return or click Continue.
- Your Mac will boot straight into the installer environment from the flash drive—bypassing the network and resolving Error 2003F.
8. Adjusting T2 Chip Startup Security Settings
If you are working on an Intel Mac with the Apple T2 Security Chip (Mac models from 2018 to 2020), the Mac may reject bootable USB drives by default, showing a lock icon or an error stating, “Security settings do not allow this Mac to use an external startup disk.”
Startup Security Utility
----------------
Secure Boot:
( ) Full Security
(*) Medium Security
( ) No Security

Allowed Boot Media:
( ) Disallow booting from external media
(*) Allow booting from external media
How to Enable External Booting:
- Turn on your Mac and immediately hold down
Command + Rto boot into local recovery. - If prompted, select an administrator user and enter the password.
- When the macOS Utilities screen appears, click Utilities > Startup Security Utility in the top menu bar.
- Authenticate by clicking Enter macOS Password and selecting an admin account.
- Under the Secure Boot section, select Medium Security (or No Security).
- Under the Allowed Boot Media section, select Allow booting from external or removable media.
- Close the utility, shut down the Mac, insert your bootable USB installer, hold the Option key at startup, and select the USB drive.
9: Reviving / Restoring Firmware via DFU Mode
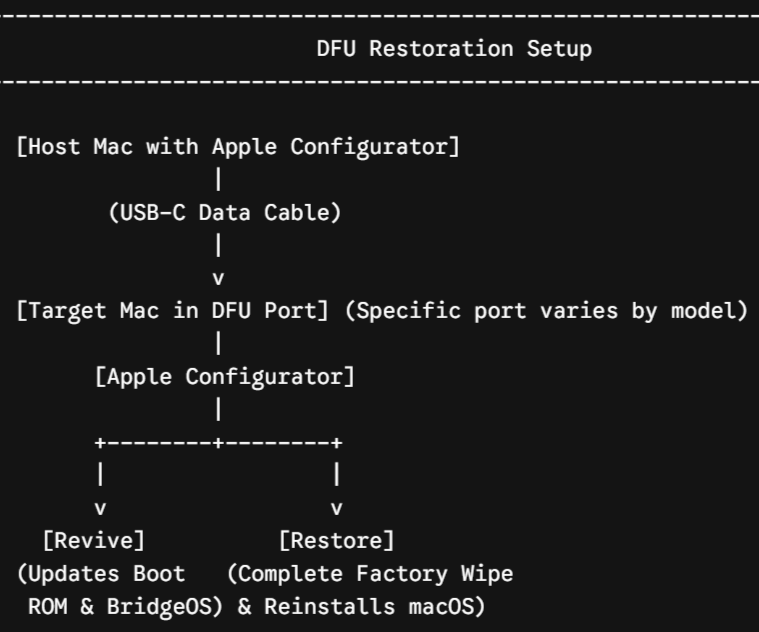
If both local and Internet Recovery are unresponsive, or a firmware update interrupted the internal controller, your Mac may need a low-level firmware revive via DFU (Device Firmware Update) Mode.
When is DFU Mode Necessary?
- The Mac exhibits Error 2003F alongside boot-looping Apple logos.
- The recovery partition is destroyed, and the internal SSD is unformatted or unreadable.
- The BridgeOS firmware on the T2 chip or the Secure Enclave on Apple Silicon is corrupted.
DFU Restoration Steps:
- Obtain a secondary working Mac running macOS Monterey or later, and install Apple Configurator from the Mac App Store.
- Connect both computers using a supported USB-C charge/data cable (ensure it is plugged into the designated DFU-compatible port—usually the front-left USB-C port on MacBooks).
- Put the malfunctioning Mac into DFU mode:
- For Apple Silicon: Shut down. Press and hold the Power button + Left Option + Left Control + Right Shift for 10 seconds. Release the three keyboard keys, then keep holding the Power button until the target Mac appears as a large “DFU” square in Apple Configurator on the host Mac.
- Right-click the DFU icon inside Apple Configurator:
- Select Advanced > Revive Device (re-flashes the firmware and recovery partition while attempting to preserve your data).
- Or select Restore (performs a full factory reset of internal storage and installs the latest stable recovery OS).
- Once the revive completes, the target Mac will boot cleanly into a fresh recovery environment without triggering Error 2003F.
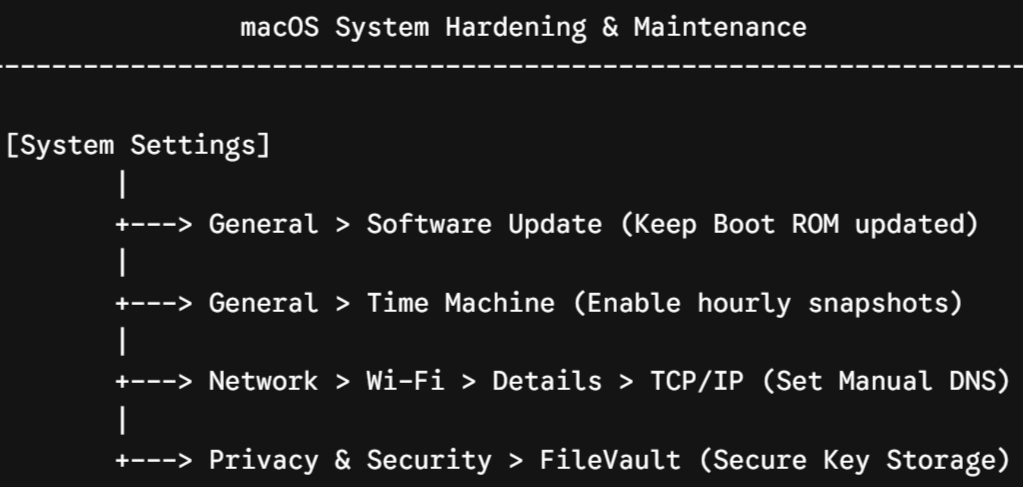
Essential macOS Settings to Prevent Future Recovery Failures
Once your Mac is operational, configure these system settings to maintain a resilient recovery environment:
1. Keep Firmware Updated via System Settings
Apple packages firmware updates directly inside standard macOS updates. Keeping your operating system current ensures your Mac has the latest network drivers and security certificates in its boot ROM.
- Open System Settings > General > Software Update.
- Click the Info icon (i) next to Automatic Updates and enable Install macOS updates and Install Security Responses and system files.
System Settings
└── General
    └── Software Update
        ├── [Toggle On] Check for updates
        ├── [Toggle On] Download new updates when available
        └── [Toggle On] Install Security Responses & system files
2. Configure Reliable Fallback DNS in Network Settings
Configure clean upstream DNS resolvers within macOS to avoid ISP-level domain blocks:
- Open System Settings > Network > Wi-Fi (or Ethernet).
- Click Details… next to your connected network.
- Select the DNS tab in the sidebar.
- Click the
+(Add) button under DNS Servers and add:1.1.1.18.8.8.89.9.9.9(Quad9)
- Click OK to save.
System Settings
└── Network
    └── Wi-Fi [Details...]
        └── DNS
            ├── 1.1.1.1  (Cloudflare Primary)
            ├── 8.8.8.8  (Google Primary)
            └── 9.9.9.9  (Quad9 Security)
3. Maintain Regular Local Time Machine Snapshots
Local recovery relies heavily on APFS container health. Time Machine automatically creates local snapshots, making it easy to revert corrupted system volumes without needing Internet Recovery.
- Open System Settings > General > Time Machine.
- Select Add Backup Disk… and attach an external drive for regular backups.
Troubleshooting Comparison Matrix
| Method | Requires 2nd Mac? | Data Preservation |
| Ethernet Connection | No | High (Non-destructive) |
| Mobile Hotspot Bypass | No | High (Non-destructive) |
| NVRAM/PRAM & SMC Reset | No | High (Non-destructive) |
| Alternate Key Combos | No | High (Non-destructive) |
| Disk Utility First Aid | No | High (Repairs storage) |
| Bootable USB Installer | Yes | High (Customizable) |
| DFU Mode Revive / Restore | Yes | Variable (Revive preserves / Restore wipes) |
Advanced Terminal Diagnostic Commands
If you manage to enter recovery mode or local single-user utility mode, the macOS Terminal provides diagnostics to debug network failures and verify connectivity.
--------------------
Recovery Terminal Console
--------------------
1. Test DNS and HTTP Connectivity to Apple’s CDN
Verify whether your Mac can resolve and contact the recovery catalog server:
Bash
# Check DNS resolution of Apple's recovery host
host osrecovery.apple.com

# Ping Apple's CDN server to check latency and packet loss
ping -c 4 osrecovery.apple.com

# Test basic HTTP/HTTPS handshake
curl -I https://osrecovery.apple.com
2. Inspect Active Network Interfaces
Verify that your Mac’s network interface has acquired an IP address via DHCP:
Bash
# List all active network interfaces and assigned IPs
ifconfig -a

# Check routing table default gateway
netstat -nr
3. List and Verify APFS Disk Topologies
Ensure internal disks are healthy and mounted properly:
Bash
# View all connected drives, containers, and partitions
diskutil list

# Verify internal container structure
diskutil verifyVolume /dev/disk1s1
Frequently Asked Questions. (FAQ)
1. Does Error 2003F mean my Mac’s internal SSD is dead?
No. Error 2003F is almost always a network communication failure between your Mac’s low-level firmware and Apple’s recovery servers. While disk errors can occasionally trigger it, hardware failure is rarely the direct cause. Switching to an Ethernet connection or using a bootable USB installer usually resolves the issue.
2. Why does the error keep returning on my home Wi-Fi?
Modern routers often use band-steering, WPA3 security, or strict firewalls that do not communicate well with the basic networking drivers built into older Mac EFI ROMs. Using a 2.4 GHz WPA2 network or a mobile phone hotspot bypasses these router restrictions.
3. How do I fix Error 2003F without another Mac?
- Connect your Mac directly to your router using a physical Ethernet cable and an adapter.
- Set up a personal hotspot on your smartphone (enable “Maximize Compatibility”) and connect your Mac to it during startup.
- Perform an NVRAM and SMC reset, then use the
Shift + Option + Command + Rshortcut to attempt downloading your Mac’s original factory operating system.
4. Can I fix Error 2003F on an Apple Silicon Mac?
Yes. Turn off your Mac, press and hold the power button to enter Startup Options, and select Options > Continue. If that fails, perform a Fallback Recovery (frOS) boot by double-pressing and holding the power button until options load. If firmware corruption is present, perform a DFU Revive using Apple Configurator on a second Mac.
5. Will resolving Error 2003F delete my personal files?
None of the network troubleshooting steps, NVRAM/SMC resets, or First Aid procedures will erase your data. Your data is erased only if you manually erase your internal drive in Disk Utility or perform a full DFU Restore.
Final Summary and Action Plan:
Resolving Mac Error 2003F comes down to isolating network, firmware, and local storage variables in a structured sequence:
- Eliminate Wireless Instability: Connect via a wired Gigabit Ethernet cable or switch to a clean mobile hotspot.
- Clear Low-Level Hardware State: Reset the NVRAM/PRAM and SMC on Intel machines.
- Change the Recovery Shortcut: Try
Shift + Option + Command + RifOption + Command + Rfails. - Bypass the Network Entirely: Create a bootable macOS USB installer on a secondary computer to perform a direct local install.
- Restore Firmware in DFU Mode: If all recovery partitions are damaged, use Apple Configurator to revive the device firmware.
Following these steps methodically will clear the 2003F error code and restore your Mac to working order.