
If your internet speed test looks fast on paper but your actual browsing feels sluggish, your games suffer from mysterious packet bursts, or certain websites refuse to load over a VPN, your Maximum Transmission Unit (MTU) is often the culprit.
Every piece of data that leaves your Windows 11 PC travels across physical wires, fiber-optic lines, and wireless spectrum inside standardized digital containers called network packets. If these packets are too large for your network path, routers drop or split them into fragments. If they are too small, your network wastes precious bandwidth transmitting repetitive packet headers.
Understanding how to change MTU on Windows gives you direct control over how your operating system packages and delivers network traffic. This comprehensive guide covers the physics of packet transmission, demonstrates how to calculate your network’s exact sweet spot using ICMP discovery, and walks through every reliable method to adjust, optimize, and troubleshoot MTU settings on Windows 11.
1. What Is MTU? The Deep Technical Breakdown
Maximum Transmission Unit (MTU) represents the largest physical packet size (measured in bytes) that an IP-enabled network interface can transmit in a single chunk without needing to break it into pieces (fragmentation).
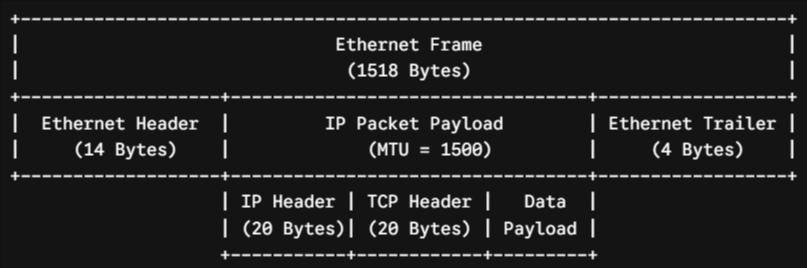
The Anatomy of an Ethernet Frame
To understand MTU, it helps to understand standard Ethernet encapsulation:
- Ethernet Header & FCS (18 Bytes): The hardware layer (MAC addresses, EtherType, Frame Check Sequence).
- IP Header (20 Bytes for standard IPv4): Source and destination IP addresses, Time to Live (TTL), and protocol identification.
- Transport Layer Header (20 Bytes for TCP / 8 Bytes for UDP / 8 Bytes for ICMP): Source and destination ports, sequence numbers, and flags.
- Data Payload (MSS – Maximum Segment Size): The actual application data (e.g., your game inputs, video stream, or webpage content).
When your network adapter runs at the standard 1500 MTU, your operating system tells network applications: “You can hand me up to 1460 bytes of raw data at a time. I will add a 20-byte TCP header and a 20-byte IP header to make a complete 1500-byte packet, which fits inside our 1518-byte Ethernet frame.”
2. Packet Fragmentation vs. MTU Under-Sizing: The Trade-Offs
Tuning MTU is an exercise in balancing processing overhead against physical network limitations.
Scenario A: MTU Too High (Causes Fragmentation)
[ 1500 Byte Packet ] ---> [ Router (MTU 1420) ] ---> [ Fragment 1: 1420B ] + [ Fragment 2: 80B ]
* Result: CPU overhead, doubled latency, dropped packets if "Don't Fragment" is set.

Scenario B: MTU Too Low (Excessive Protocol Overhead)
[ Small Data ] + [ 40B Headers ] + [ Small Data ] + [ 40B Headers ]
* Result: Wasted throughput, lower maximum transfer speeds.
The Cost of Packet Fragmentation
When your Windows 11 PC sends a 1500-byte packet across an internet connection with an intermediate router that only accepts 1420 bytes, one of two things happens:
- Fragmentation Occurs: The intermediate router splits the single packet into two smaller packets. The receiving server must hold both fragments in memory, wait for both to arrive, reassemble them, and only then process the data. If a single fragment gets dropped in transit, the entire original 1500-byte transmission fails and must be retransmitted.
- Path MTU Discovery (PMTUD) Black Holes: If your packet has the
DF(Don’t Fragment) flag enabled—which is standard for modern TCP connections—the router simply drops the packet and sends back an ICMP “Fragmentation Needed” error. If a firewall along the way blocks that return ICMP message, your PC never finds out why the connection died. The connection hangs endlessly on SSL/TLS handshakes or media streaming.
The Cost of Under-Sizing Your MTU
Setting your MTU artificially low (e.g., dropping straight to 1200 bytes just to “be safe”) introduces heavy protocol overhead. Every packet requires at least 40 to 60 bytes of combined IP and TCP/UDP headers. When you send thousands of packets per second, an undersized MTU means a substantial percentage of your available bandwidth carries header metadata rather than actual data.
3. Standard MTU Profiles Across Modern Networks
Before learning how to change MTU on Windows, review these industry-standard baseline values:
| Connection Type / Environment | Standard MTU | Notes / Overhead Origin |
| Standard Ethernet (LAN / Fiber IPoE) | 1500 | The universal standard for home routers and standard Ethernet switching. |
| PPPoE (DSL, VDSL, Some Fiber ISPs) | 1492 | Requires 8 bytes of overhead for the Point-to-Point protocol header. |
| WireGuard VPN | 1420 | Consumes ~80 bytes for UDP encapsulation and cryptographic headers. |
| OpenVPN (IPv4/UDP) | 1400 – 1450 | Varies depending on cipher suites and HMAC authentication. |
| IPsec / IKEv2 | 1360 – 1400 | Heavy encryption and tunneling wrapper overhead. |
| 4G / 5G Cellular Hotspots | 1340 – 1428 | Mobile carriers apply GTP (GPRS Tunneling Protocol) encapsulation. |
| IPv6 Minimum Standard | 1280 | The absolute minimum MTU mandated by RFC 8200 for any IPv6 route. |
| Jumbo Frames (Enterprise LAN / NAS) | 9000 | Supported on gigabit/10G switches for isolated local network file transfers. |
4. How to Find Your Optimal MTU via Ping Testing
Never guess your MTU value. Windows includes a built-in diagnostic tool (ping.exe) that lets you probe your network path with precise byte payloads while enforcing the Don't Fragment rule.
Step 1: Open Terminal as Administrator
Right-click the Windows 11 Start button and select Terminal (Admin) or Command Prompt (Admin).
Step 2: Run the Non-Fragmenting Ping Probe
Execute the ping command using the -f (Don’t Fragment) and -l (Buffer Size) switches against a reliable external server:
DOS
ping 1.1.1.1 -f -l 1472
(We start testing at 1472 bytes because: $1472 \text{ (Data)} + 20 \text{ (IP Header)} + 8 \text{ (ICMP Header)} = 1500 \text{ bytes total MTU}$.)
Pinging 1.1.1.1 with 1472 bytes of data:
Reply from 1.1.1.1: bytes=1472 time=14ms TTL=58
Reply from 1.1.1.1: bytes=1472 time=13ms TTL=58
Step 3: Interpret Your Ping Results
- Case A: Successful Replies
If all 4 pings return successfully with zero packet loss, your current network path fully supports an MTU of 1500. - Case B: Packet Needs to Be Fragmented
If the output returns:Packet needs to be fragmented but DF set.The packet size exceeds the path’s maximum limit.
Step 4: Step Down and Find the Exact Threshold
Reduce your buffer size by 10 or 12 bytes at a time until the ping succeeds:
DOS
ping 1.1.1.1 -f -l 1460
ping 1.1.1.1 -f -l 1452
ping 1.1.1.1 -f -l 1440
Once you find the highest value that succeeds without fragmenting (for example, 1464), test by adding 1 byte back until you hit the precise boundary.
Step 5: The Golden MTU Formula
To calculate your final target MTU value, add the 28 bytes of required header space back to your successful buffer payload:
$$\text{Optimal MTU} = \text{Maximum Non-Fragmented Buffer Size} + 28$$
Example: If your maximum non-fragmented ping buffer was 1464:
$$\text{Optimal MTU} = 1464 + 28 = 1492$$
Now that you have your target number, here are the step-by-step methods showing how to change MTU on Windows 11.
5. Method 1: How to Change MTU on Windows 11 via PowerShell (Recommended)
PowerShell provides the cleanest, most modern interface for managing network adapters on Windows 11 using the dedicated NetTCPIP module.
Step 1: Identify Your Active Network Interfaces
Open PowerShell as Administrator and list all active interfaces along with their index numbers and current MTU settings:
PowerShell
Get-NetIPInterface
Look at the resulting table:
ifIndex InterfaceAlias                  AddressFamily NlMtu(Bytes) ConnectionState
------- --------------                  ------------- ------------ ---------------
18      Wi-Fi                           IPv4                  1500 Connected
12      Ethernet                        IPv4                  1500 Disconnected
1       Loopback Pseudo-Interface 1     IPv4            4294967295 Connected
18      Wi-Fi                           IPv6                  1500 Connected
Note two critical pieces of information:
- InterfaceAlias (e.g.,
Wi-FiorEthernet) - ifIndex (e.g.,
18)
Step 2: Set the New MTU for IPv4
To apply your target MTU to an interface using its index number:
PowerShell
Set-NetIPInterface -InterfaceIndex 18 -NlMtuBytes 1492
Or target the adapter directly by its name:
PowerShell
Set-NetIPInterface -InterfaceAlias "Wi-Fi" -AddressFamily IPv4 -NlMtuBytes 1492
Step 3: Update IPv6 (If Applicable)
If your ISP provides native IPv6 connectivity, ensure your IPv6 stack matches your intended MTU (or sits at least at the 1280-byte IPv6 minimum):
PowerShell
Set-NetIPInterface -InterfaceAlias "Wi-Fi" -AddressFamily IPv6 -NlMtuBytes 1492
Step 4: Verify the New Setting
Confirm that Windows registered the change:
PowerShell
Get-NetIPInterface -InterfaceIndex 18
You will see NlMtu(Bytes) immediately reflect your new value (1492).
6. Method 2: How to Change MTU on Windows Using Netsh (Command Prompt)
The legacy netsh (Network Shell) utility remains widely used across system administration scripts and batch files.
[ CMD / Netsh Flow ]
1. Run CMD as Admin
   └──> 2. `netsh interface ipv4 show subinterfaces`
        └──> 3. Identify Interface Name (e.g., "Ethernet")
             └──> 4. `netsh interface ipv4 set subinterface "Ethernet" mtu=1492 store=persistent`
Step 1: Open Command Prompt as Administrator
Press Win + R, type cmd, and press Ctrl + Shift + Enter.
Step 2: Display Current Subinterfaces
Run the following command to view all configured network adapters:
DOS
netsh interface ipv4 show subinterfaces
Example output:
   MTU  MediaSenseState   Bytes In  Bytes Out  Interface
------  ---------------  ---------  ---------  -------------
  1500                1   52819402   12948102  Wi-Fi
  1500                5          0          0  Ethernet
  1420                1    8940192    4102910  WireGuard
Step 3: Apply the Persistent MTU Command
Run the configuration command, replacing "Wi-Fi" with your exact adapter name and 1492 with your calculated MTU:
DOS
netsh interface ipv4 set subinterface "Wi-Fi" mtu=1492 store=persistent
Important: The
store=persistentparameter ensures your change survives system reboots and network reconnects. If you omit this, Windows resets the value back to default on the next restart.
Step 4: Verify Subinterface Configuration
Re-run the display command:
DOS
netsh interface ipv4 show subinterfaces
Ensure the MTU column for your adapter displays your new number.
7. Method 3: How to Change MTU on Windows via Device Manager (Jumbo Frames & Hardware Settings)
Certain physical network cards (such as Intel I225-V/I219-V or Realtek 2.5GbE Gaming controllers) let you adjust frame sizes directly within their hardware drivers.
Device Manager
└── Network Adapters
    └── [Your Adapter: e.g., Realtek PCIe 2.5GbE]
        └── (Right-Click > Properties)
            └── "Advanced" Tab
                ├── Jumbo Packet / Jumbo Frame ---> [ 9KB MTU for LAN / NAS ]
                └── MTU / Packet Size ---------> [ Custom Value ]
- Press
Win + Xand select Device Manager. - Expand the Network adapters category.
- Double-click your physical adapter (e.g., Intel(R) Ethernet Controller I225-V).
- Navigate to the Advanced tab.
- Search the property list for Jumbo Packet, Jumbo Frame, or Maximum Frame Size.
- Select your target frame size from the dropdown menu (e.g., 9014 Bytes or 4088 Bytes for local LAN transfers, or Disabled / 1500 for standard internet routing).
- Click OK to apply. Your network connection will briefly disconnect for 2–3 seconds while the driver reloads.
8. Method 4: How to Change MTU on Windows via the Windows Registry (Deep Dive)
For enterprise fleet management, unattended installations, or situations where command-line tools fail to maintain persistence across specialized VPN profiles, you can set the MTU directly in the Windows Registry.
Registry Hive:
HKEY_LOCAL_MACHINE\SYSTEM\CurrentControlSet\Services\Tcpip\Parameters\Interfaces\
                                                                  └── {[GUID-1]}
                                                                  └── {[GUID-2]} -> (Matches your adapter)
                                                                        ├── MTU (DWORD) = 1492
Step 1: Match Your Adapter to Its Registry GUID
Every physical and virtual network interface has a unique Globally Unique Identifier (GUID). To find which GUID belongs to your network card, run this command in PowerShell:
PowerShell
Get-NetAdapter | Select-Object Name, InterfaceDescription, InterfaceGuid
Output:
Name     InterfaceDescription                  InterfaceGuid
----     --------------------                  -------------
Wi-Fi    Intel(R) Wi-Fi 6 AX201 160MHz         {A1B2C3D4-E5F6-7890-ABCD-EF1234567890}
Ethernet Realtek Gaming 2.5GbE Family Controller {F0E1D2C3-B4A5-6789-0123-456789ABCDEF}
Step 2: Open Registry Editor
- Press
Win + R, typeregedit, and hit Enter. - Navigate to the following path:
PlaintextHKEY_LOCAL_MACHINE\SYSTEM\CurrentControlSet\Services\Tcpip\Parameters\Interfaces\ - Locate the subfolder matching the InterfaceGuid of your active network adapter.
Step 3: Create or Modify the MTU DWORD Key
- Select the matching GUID key folder in the left pane.
- Check the right pane for a value named
MTU. - If it does not exist:
- Right-click an empty area $\rightarrow$New$\rightarrow$DWORD (32-bit) Value.
- Name it
MTU.
- Double-click the
MTUkey:- Set the Base toggle to Decimal.
- Enter your target MTU value (e.g.,
1492or1420). - Click OK.
+-------------------------------------------------------------+
| Edit DWORD (32-bit) Value                                   |
+-------------------------------------------------------------+
| Value name:                                                 |
| MTU                                                         |
|                                                             |
| Value data:                   Base                          |
| [ 1492       ]                ( ) Hexadecimal  (*) Decimal  |
+-------------------------------------------------------------+
- Restart your computer or disable and re-enable your network adapter to load the registry change into active memory.
9. Adapter-Specific MTU Tuning: Wi-Fi, Ethernet, VPNs, and Cellular
Different physical and virtual connections handle packet boundaries differently. Here is how to configure each connection type.
                        +--------------------------------+
                        |       Windows 11 TCP/IP        |
                        +---------------+----------------+
                                        |
      +--------------------+------------+------------+--------------------+
      |                    |                         |                    |
+-----+------+      +------+-----+             +-----+------+      +------+-----+
|  Ethernet  |      |   Wi-Fi    |             |    VPN     |      |  Cellular  |
|  MTU: 1500 |      | MTU: 1500  |             | MTU: 1420  |      | MTU: 1420  |
+------------+      +------------+             +------------+      +------------+
1. Wi-Fi (WLAN) Adapters
Wireless networks introduce frame aggregation and airtime contention. While 802.11 Wi-Fi frames can technically support larger payloads internally, standard 802.3 Ethernet framing across your home router limits your base Wi-Fi interface to 1500. If your router relies on PPPoE fiber/DSL encapsulation, lower your Wi-Fi MTU to 1492.
2. Physical Ethernet (LAN)
Standard Gigabit (1000BASE-T) and multi-gigabit (2.5G/10G) Ethernet links should stay at 1500 for all external internet traffic. Only increase this to Jumbo Frame sizes (9000 bytes) if both your PC and your local storage target (like a NAS) are connected over an isolated switch that supports end-to-end Jumbo Frames.
3. Virtual Private Network (VPN) Adapters
VPNs wrap your existing IP packets inside encrypted security payloads (ESP/UDP). If your base network has an MTU of 1500 and you attempt to send a 1500-byte packet through a VPN tunnel, the added encryption headers will push the total size past 1560 bytes, causing severe fragmentation at the ISP level.
- WireGuard: Set the virtual interface MTU to
1420(or1360on mobile networks). - OpenVPN: Set the TUN adapter MTU to
1400–1450. - Tailscale / ZeroTier: Standardize around
1280–1400depending on whether IPv6 relaying is active.
4. Cellular Hotspots & 5G USB Dongles
Mobile networks enforce strict MTU boundaries due to carrier-grade NAT (CGNAT) and GTP tunneling. Setting your Windows 11 cellular adapter or tethered Wi-Fi connection to 1420 or 1360 prevents random connection stalls when browsing on mobile data.
10. Gaming and Latency: Does Lowering MTU Improve Ping?
A common question among competitive gamers is whether tweaking your MTU helps lower in-game ping.
+-----------------------------------------------------------------------------+
|                            The Gaming MTU Myth                              |
+-----------------------------------------------------------------------------+
| Myth: Lowering MTU to 576 or 300 makes gaming packets travel faster.        |
|                                                                             |
| Reality: Game tick packets are already tiny (usually 50 to 200 bytes).       |
|          They NEVER hit the 1500-byte ceiling!                              |
|                                                                             |
| True Benefit: Setting the CORRECT MTU prevents game-update bursts, voice    |
|               chat streams, and background telemetry from fragmenting and   |
|               choking your real-time packet queue (bufferbloat).            |
+-----------------------------------------------------------------------------+
The Real Impact on Gaming
- Game Tick Updates: Real-time games (e.g., Valorant, CS2, Apex Legends) send position updates that are only 60–250 bytes. These packets never trigger fragmentation regardless of whether your MTU is 1400 or 1500.
- Bufferbloat Prevention: When your game downloads texture streams, VoIP voice packets, and spatial telemetry at the same time, mismatched MTUs fragment large background packets. These fragmented pieces clog router queues, causing sudden 200ms latency spikes (“jitter”).
- Packet Loss Elimination: If an intermediate router drops fragmented packets due to strict DDoS protection, matching your MTU correctly eliminates those drops entirely.
11. Troubleshooting Common MTU Issues on Windows 11
Issue 1: “The parameter is incorrect” or “Access is denied”
If PowerShell or Command Prompt rejects your command:
- You forgot to launch the terminal with elevated administrative rights.
- The interface alias name has a typo. Wrap names containing spaces in double quotes:
"Wi-Fi".
Issue 2: Changes Disappear After Rebooting
If your MTU reverts to default after a system restart:
- In
netsh, make sure you appendedstore=persistentto your command. - Third-party “network optimizer” utilities or VPN auto-connect clients may be overriding your settings at startup. Check Task Manager $\rightarrow$ Startup Apps.
Issue 3: Certain Websites (Like Banking Portals) Stop Loading
If basic sites like Google work but encrypted banking or shopping sites time out:
- You are experiencing a Path MTU Discovery (PMTUD) black hole. Lower your MTU by another 20–40 bytes (e.g., from 1492 down to 1452) and test again.
12. How to Revert MTU Settings Back to Windows Default
If you experience unexpected behavior or switch to a new ISP, you can easily restore the default Windows 11 MTU configuration.
Revert via PowerShell:
PowerShell
# Restore standard 1500 MTU to IPv4
Set-NetIPInterface -InterfaceAlias "Wi-Fi" -AddressFamily IPv4 -NlMtuBytes 1500

# Restore standard 1500 MTU to IPv6
Set-NetIPInterface -InterfaceAlias "Wi-Fi" -AddressFamily IPv6 -NlMtuBytes 1500
Revert via Netsh:
DOS
netsh interface ipv4 set subinterface "Wi-Fi" mtu=1500 store=persistent
13. Frequently Asked Questions (FAQ)
What is the default MTU on Windows 11?
The default MTU for standard Ethernet and Wi-Fi adapters in Windows 11 is 1500 bytes.
Will changing my MTU increase my download speeds?
Changing your MTU will not increase your raw bandwidth (e.g., turning a 100 Mbps line into a 200 Mbps line). However, if your connection currently suffers from packet fragmentation or drops, configuring the correct MTU will restore your actual usable throughput and eliminate connection stalls.
Should I change MTU on my PC or on my router?
Whenever possible, configure the MTU directly on your primary router. When you adjust it on your router, all devices across your home network (PCs, consoles, smartphones) benefit automatically. If you do not have administrative access to your router, adjusting the setting on your Windows 11 PC provides the exact same benefit for that specific machine.
What is the lowest safe MTU value for Windows 11?
For IPv4, the absolute theoretical minimum is 68 bytes, but practically you should never go below 576 bytes (the historic minimum for dial-up and specialized networks). For IPv6, the standard requires an absolute minimum of 1280 bytes; setting an MTU below 1280 breaks IPv6 communication entirely.
Can a bad MTU setting cause packet loss?
Yes. If packets exceed the size permitted by an intermediate router that drops fragments or blocks ICMP notifications, your system will register consistent packet loss and interrupted downloads.
14. Summary Checklist: Mastering MTU on Windows 11
To keep your connection running cleanly, follow this quick reference checklist:
- Diagnose First: Run
ping 1.1.1.1 -f -l 1472in Command Prompt to see if your packets fragment. - Find Your Value: Step down your buffer size until fragmentation stops, then add 28 bytes to calculate your target MTU.
- Apply via PowerShell: Use
Set-NetIPInterface -InterfaceAlias "YourAdapter" -NlMtuBytes <CalculatedValue>for a clean, persistent setup. - Tune VPNs Separately: Keep your physical adapters at 1500 (or 1492 for PPPoE) and allow VPN clients to manage their own tunnel MTUs (typically 1420 or lower).
- Verify: Check your active configuration anytime using
Get-NetIPInterfaceornetsh interface ipv4 show subinterfaces.
Adjusting your MTU removes an invisible bottleneck between your PC and the open internet, ensuring your packets flow smoothly without unnecessary fragmentation.
Table of contents
- 1. What Is MTU? The Deep Technical Breakdown
- 2. Packet Fragmentation vs. MTU Under-Sizing: The Trade-Offs
- 3. Standard MTU Profiles Across Modern Networks
- 4. How to Find Your Optimal MTU via Ping Testing
- 5. Method 1: How to Change MTU on Windows 11 via PowerShell (Recommended)
- 6. Method 2: How to Change MTU on Windows Using Netsh (Command Prompt)
- 7. Method 3: How to Change MTU on Windows via Device Manager (Jumbo Frames & Hardware Settings)
- 8. Method 4: How to Change MTU on Windows via the Windows Registry (Deep Dive)
- 9. Adapter-Specific MTU Tuning: Wi-Fi, Ethernet, VPNs, and Cellular
- 10. Gaming and Latency: Does Lowering MTU Improve Ping?
- 11. Troubleshooting Common MTU Issues on Windows 11
- 12. How to Revert MTU Settings Back to Windows Default
- 13. Frequently Asked Questions (FAQ)
- 14. Summary Checklist: Mastering MTU on Windows 11